


If you're a beginner who's just getting started with building web applications using Django, creating, handling, and using virtual environments for your projects can get pretty overwhelming and time-consuming. In this article, I'll try to eliminate this stress from your life by explaining what virtual environments are, why they are used, and how you can create one for your project using python's venv module.
What is a virtual environment?
Think of a virtual environment as an isolated compartment in which your project and everything it needs to work properly resides. It is a tool that separates the dependencies, i.e., required packages and modules of different projects.
In the simplest terms, a virtual environment is just a directory containing subdirectories and files to specifically serve the needs of one project. Just like directories, you can create as many virtual environments as you may desire.
Why do we need a virtual environment?
More often than not, you'll find yourself working on multiple projects at the same time, and it is very likely that those projects will require different third-party applications or different versions of them to work with. Suppose you're creating a web application using Django, and you're working on two different projects. One project requires an older version of Django than the other. You can see how keeping these projects in the same directory can cause problems during the development process. This is where virtual environments come to your rescue. You can create an isolated environment with required dependencies for each project, which'll not have any effect or bearing on the others.
It's important for you as a developer to understand the workings of virtual environments and to appreciate their significance, as you'll be using them very often in your future endeavors.
Create a virtual environment using python
Now that we've got an idea about what virtual environments are and why they are used, let's get into creating one for ourselves.
Python is the favorite of developer community, not without a reason. It provides excellent modules for creating virtual environments like pipenv, virtualenv, and venv. In this tutorial, we'll be creating our virtual environment using the python's venv module.
Personally, I found venv easier to work with when I was starting out, and I consider it a better choice for beginners as compared to others.
Let's start!
I'll be using Windows 10 for the purpose of this tutorial, but macOS/Linux users should be able to follow along with minimal changes.
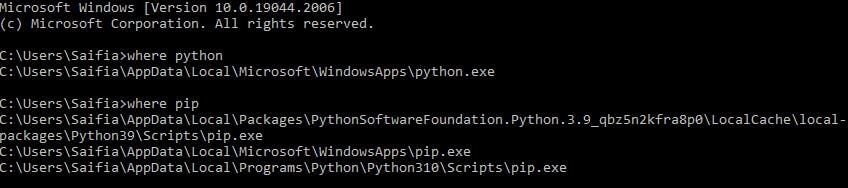
First, make sure that python and pip are installed on your computer. You can do this by typing the following commands on your Windows Command Prompt.
>> where python
>> where pip
Open command prompt by pressing the Windows key and typing 'command prompt' in the search bar. macOS's users can use the Unix Command Shell. Linux users can use Linux Command Line.
If you see something like this after entering the above commands, you've python installed, and you can move ahead with this tutorial.
However, if you so see a message like 'No module named python' you don't have python installed. Head over to python.org and download the latest version of python. Make sure to enter python to path after installing it if it's not already there. I would suggest you take help from this tutorial to figure out path and adding python to it.
Next, create a virtual environment using this command.
>> python -m venv ./virtual_env
In this case, I've named our virtual environment 'virtual_env' but you can name it anything you like.
We've created a virtual environment. Now navigate to this newly created directory named 'virtual_env' in your computer. Its structure should look something like this.
Include
Lib
  site-packages
    _distutils_hack
    pip
    pip-22.0.4.dist-info
    pkg-resources
    setuptools
    others...
Scripts
  activate
  pip
  pip3.9
  pip3
  python
  others...
pyvenv
Now navigate to the 'Scripts' subdirectory inside your virtual environment using the 'cd' command and install Django.
>> pip install django
Once Django has installed, check its version by:
>> django-admin --version
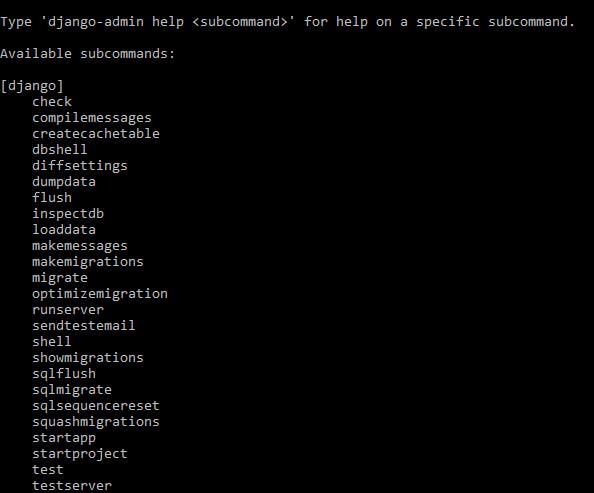
See all the functions supported by django-admin by:
>> django-admin
Now that we've installed Django, we are ready to start our first project.
Before that, ensure that you're still in the 'Scripts' subdirectory and activate your virtual environment by the following command:
>> activate
Now you should see the name of your virtual environment on the left side of the command like this:

You can deactivate your virtual environment by a similar command:
>> deactivate
Now type in the following command to start your first project:
>> django-admin startproject firstproject
I've named the project 'firstproject' but you can name it anything you want.
A subdirectory by the name of 'firstproject' would've been created inside your 'Scripts' subdirectory. Its structure would look something like this:
firstproject
    __init__.py
    asgi.py
    settings.py
    urls.py
    wsgi.py
manage.py
Congratulations, you've created your first Django project. Now navigate to the 'firstproject' directory and type in the following command to open your project in VS Code:
>> code .
Alternatively, you can open this folder in VS Code manually.
Once in VS Code, make sure that you're using the python interpreter inside your virtual environment. You can do this by going to View > Command Palette > Python: Select Interpreter > + Enter interpreter path. There, enter the path to your virtual environment 'Scripts' subdirectory. Once you've done this, you can close the Windows Command Prompt, and just use the VS Code terminal.
Now, type the following command:
>> python manage.py runserver
You should see something like this:
Watching for file changes with StatReloader Performing system checks...
System check identified no issues (0 silenced).
You have 18 unapplied migration(s). Your project may not work properly until you apply the migrations for > app(s): admin, auth, contenttypes, sessions. Run 'python manage .py migrate' to apply them. September 19, 2022 - 17:46:04 Django version 4.1.1, using settings 'firstproject.settings' Starting development server at http://127.0.0.1:8000/ Quit the server with CTRL-BREAK.
Open the given link http://127.0.0.1:8000/ in any browser. You should see something like this:

Yes! Your development server is up and running. Now you can go ahead and work on your web application.
Thanks for reading this tutorial!