Route Handlers in Next.js 13 – Effectively Manage your API Routes
Everything you need to know about creating custom request handlers in Next.js
With its relatively recent release of the App Router, Next.js has introduced us to a new way of building web applications. Those who are already familiar with Next.js will understand it as an evolution of the previous file-system-based router in the Pages folder.
While there has been a lot of buzz regarding the recommended use of the App Router for building new web applications, and the incremental transition from pages to app folder for older web applications, that is not the focus of this blog. In this blog, we'll discuss the new Route Handlers that have been made available in the app folder, which are equivalent to the API routes in the pages folder.
We'll learn all about utilizing these effectively to create custom API routes for our web applications.
Route Handlers And Where To Put Them:
Route handlers are the equivalent of API routes in the pages folder, and are only available to be used with the App Router inside the app folder.
In an attempt to learn by doing, create a new Next.js project by opening a terminal of your choice, and running the following command:
npx create-next-app@latest
Learn more about setting up a Next.js project here.
You'll be prompted to configure the project's name and settings. Say yes to using an App Router. Moreover, I'll be using TypeScript for this tutorial, but you can also follow along with JavaScript if you would prefer that.
Once your project is created, open it in VS Code. Your app folder will have a file structure similar to this:
- app
    - favicon.ico
    - globals.css
    - layout.tsx
    - page.tsx
We don't get an api folder by default, as we did with the pages folder.
It is possible to define our API routes directly inside the app folder, however, that is generally not considered a good practice because they have no relation to the frontend pages being rendered, so they should not be present at the same route segment level.
So we by convention create all our API routes inside an api folder. Go ahead and create an api folder inside the app folder, and create a route.js|ts file in it.
Note that route is a special filename just like page and layout.
Syntax Simplicity And Ease Of Use:
Below is the code for making a simple get request using Express.js:
// Create an Express application
const express = require('express');
const app = express();

// Define a route that responds to GET requests
app.get('/api/users', (req, res) => {
    // Create a list of users
    const users = [
        { id: 1, name: 'Aisha' },
        { id: 2, name: 'Jane' },
        { id: 3, name: 'Smith' }
    ];

    // Send the list of users as a JSON response
    res.json(users);
});

// Start the server
app.listen(3000, () => {
    console.log('Server is listening on port 3000');
});
We import the Express.js library and create an Express web application called 'app'. Then we define a route that responds to HTTP GET requests. When someone accesses that route, the server creates a list of users (with their IDs and names). It then sends this list of users back to the client (usually a web browser) as a JSON response. Finally, we start the server and make it listen on port 3000. When it starts, it displays a message in the console to let us know it's running.
Now let's look at how we can make the same get request using Next.js Route Handlers:
export async function GET(request: Request){

    const users: { id: number, name: string }[] = [
        { id:1, name: 'Aisha' },
        { id:2, name:'Jane' },
        { id:3, name: 'Smith' }
    ];

    return new Response(JSON.stringify(users))
};
Doesn't it look convenient? There's no need for any additional configuration or setup. Next.js takes care of the rest while acting like a traditional backend server and providing us with middleware, parsing, authentication as well as serverless functions.
Supported HTTP Methods:
Next.js supports the following HTTP methods:
GET: Retrieves data or resources from the server.
POST: Submits data to the server to create a new resource.
PUT: Updates or replaces an existing resource on the server.
PATCH: Partially updates an existing resource on the server.
DELETE: Removes a specific resource from the server.
HEAD: Retrieves the headers of a resource without fetching its body.
OPTIONS: Retrieves the supported HTTP methods and other communication options for a resource.
Rest Client For API Testing:
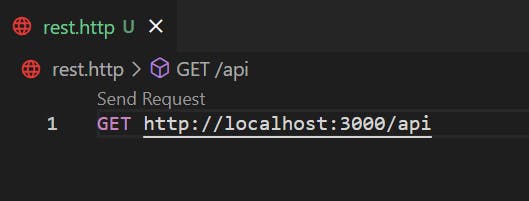
Before we move forward, install an extension by the name of Rest Client in your VS Code. Once you've installed it, create a rest.http file in your project's root directory.
We can test our APIs using it as such:

When you click on Send Request, you'll receive a response as such:
HTTP/1.1 200 OK
vary: RSC, Next-Router-State-Tree, Next-Router-Prefetch, Next-Url
content-type: text/plain;charset=UTF-8
Date: Tue, 26 Sep 2023 04:35:49 GMT
Connection: close
Transfer-Encoding: chunked

[
  {
    "id": 1,
    "name": "Aisha"
  },
  {
    "id": 2,
    "name": "Jane"
  },
  {
    "id": 3,
    "name": "Smith"
  }
]
Make sure that your project is running on http://localhost:3000 before you send your API requests.
NextResponse:
According to Next.js official documentation:
Although
Response.json()is valid, native TypeScript types currently show an error, you can useNextResponse.json()for typed responses instead.
In other words, we've to use NextResponse instead of Response in a situation where we are working with TypeScript and are trying to use the .json() method on a response object, possibly from an HTTP request made using a library like Axios or Fetch.
GET Parameters:
Inside the api folder, create a new folder by the name of params and a route.ts|js file in it.
The
apifolder follows the same file-based routing pattern as theappfolder.
Suppose we want to parse certain query parameters from the request's URL. Considering that the incoming parameters are 'id' and 'name', we can do so as such:
import { NextResponse } from "next/server";

export async function GET(request: Request) {
    // Parsing URL's parameters
    const { searchParams } = new URL(request.url);
    // Retrieving the values
    const id = searchParams.get('id');
    const name = searchParams.get('name');

    return NextResponse.json({ id, name })
};
Let's send a request:
GET http://localhost:3000/api/params?id=1&name=Aisha
We'll receive a response as such:
HTTP/1.1 200 OK
vary: RSC, Next-Router-State-Tree, Next-Router-Prefetch, Next-Url
content-type: application/json
Date: Tue, 26 Sep 2023 05:26:52 GMT
Connection: close
Transfer-Encoding: chunked

{
  "id": "1",
  "name": "Aisha"
}
As you can see, we captured the URL parameters of our GET request, and returned them as a JSON object in the response.
The incoming parameters will not always be known to us in advance so let's modify our GET function to be able to parse and retrieve all kinds of parameters:
import { NextResponse } from "next/server";

export async function GET(request: Request) {
    // Parsing URL's parameters
    const { searchParams } = new URL(request.url);
    // Converting query parameters into key-value pairs
    const paramsObj = Object.fromEntries(searchParams.entries());

    return NextResponse.json(paramsObj);
};
Let's test this:
GET http://localhost:3000/api/params?id=1&name=Aisha&age=20
Response:
HTTP/1.1 200 OK
vary: RSC, Next-Router-State-Tree, Next-Router-Prefetch, Next-Url
content-type: application/json
Date: Tue, 26 Sep 2023 05:36:37 GMT
Connection: close
Transfer-Encoding: chunked

{
  "id": "1",
  "name": "Aisha",
  "age": "20"
}
You can test this with any number or combination of parameters, you'll always receive a valid JSON object in response.
Dynamic Route Handlers:
According to Next.js official documentation, Route handlers are evaluated dynamically when:
Using the
Requestobject with theGETmethod.Using any of the other HTTP methods, i.e.,
POST,PUT,PATCHetc.Using Dynamic Functions like
cookiesandheaders.Manually specifying dynamic mode.
By dynamic evaluation, we mean that the determination of which Route Handler to execute is not fixed or predetermined at the start of the application. Instead, it is determined at runtime, based on the incoming request. This is in contrast to static routing, where you define a fixed mapping between URLs and handlers in advance.
Dynamic Route Segments And Slugs:
Dynamic route segments are parts of a URL that can vary and are used to capture specific values from the URL to determine what content should be displayed on a web page. For example, in the URL /blogs/:slug, :slug is a dynamic route segment.
A slug can be thought of as a human-readable, URL-friendly version of a resource's title or name. It is typically used in a dynamic route segment to identify a specific page or resource on a website.
The dynamic route segment in the previous example of /blogs/:slug can be of the forms:
/blogs/javascript-basics
/blogs/introduction-to-react
javascript-basics and introduction-to-react are slugs that help identify the respective blog.
To handle a dynamic route segment as such, we'll have to create a blogs folder with a dynamic slug folder nested inside it:
- api
    - blogs
        - [slug]
            route.tsx
We can easily capture the slug parameter in our GET function as such:
import { NextRequest, NextResponse } from "next/server";

export async function GET(request: NextRequest, {params}: any) {
    const slug = params.slug;
    return NextResponse.json({slug})
};
Let's send a request:
GET http://localhost:3000/api/blogs/blog1342
We'll receive the slug parameter in response:
HTTP/1.1 200 OK
vary: RSC, Next-Router-State-Tree, Next-Router-Prefetch, Next-Url
content-type: application/json
Date: Tue, 26 Sep 2023 06:06:07 GMT
Connection: close
Transfer-Encoding: chunked

{
  "slug": "blog1342"
}
We can capture more than one slug parameter as well.
Nest folders as such:
- api
    - blogs
        - [slug]
            - comment
                - [commentSlug]
                    route.tsx
            route.tsx
Inside api/blogs/[slug]/comment/[commentSlug]/route.tsx file:
import { NextRequest, NextResponse } from "next/server";

export async function GET(request: NextRequest, {params}: any) {
    const slug = params.slug;
    const commentSlug = params.commentSlug;
    return NextResponse.json({slug, commentSlug})
};
Let's make a request:
GET http://localhost:3000/api/blogs/blog1342/comment/Great!
We'll receive both slug parameters in response:
HTTP/1.1 200 OK
vary: RSC, Next-Router-State-Tree, Next-Router-Prefetch, Next-Url
content-type: application/json
Date: Tue, 26 Sep 2023 06:20:28 GMT
Connection: close
Transfer-Encoding: chunked

{
  "slug": "blog1342",
  "commentSlug": "Great!"
}
Conclusion:
In this blog, we've tried to explore how Next.js simplifies the process of sending and managing API requests through Route Handlers, making it easier to build robust applications that can adapt to a variety of user interactions.
There is more to Route Handlers than could be covered in a single blog. I encourage you to read the official documentation and investigate the subject on your own for a deeper understanding. I'll be happy to help you with your queries, if any.
Thanks for reading!
